Thursday, December 26, 2013
Happy Holidays!
Hello, dear friends! We're all safe and sound in our new home in Montana. We just had a lovely Christmas, even though we're still getting settled in. I'll get back to blogging after New Years, and I'm sure I'll have all kinds of wonderful things to share with you then. See you, and have a happy and safe holiday!
Saturday, December 7, 2013
Saying Goodbye - a Picture Blog
Now that we're moving across the country, I thought it would be nice to look back on the house we lived in during our last year in NC:
 |
| The neighbor's ducks |
 |
| Our mutt chillin' on the front porch |
 |
| Hummingbird at my feeder |
 |
| Deer in the field behind our house |
 |
| My flowers |
 |
| More flowers |
 |
| A rainbow over the cornfield next to our house |
 |
| Fairy ring in the back yard |
 |
| Goodbye, house! |
Tuesday, December 3, 2013
Quick Folding Table Updo
When I saw this idea on Pinterest, I did a headdesk. I can't believe how simple it is, and somehow I couldn't think of it myself.

I have an ugly old card table that was in dire need of this makeover. Well, a couple of weeks ago, I finally had the chance to do it. I was visiting a JoAnn fabric store with my mother, when I just happened to wander down their fall clearance isle. I wasn't even looking for one at the time, but I found a pretty vinyl tablecloth for 70% off, making the sale price about two dollars. I just love when things work out like that! That evening I went straight to work redoing my table top:
 |
| Yucky table! |
 |
| Phase One: Remove Top |
 |
| Phase Two: Remove Tablecloth from Package |
PHASE THREE: ?
(Seriously, though, I don't know why I don't have any photos of me stapling the tablecloth on the tabletop, but that's what happened next.)
 |
| Phase Four: PROFIT! |
It took me about an hour to complete this, and approximately forty-five minutes of that was me trying to find a screwdriver, staple gun, and staples at my parents' house. But now I have a pretty, new table! Thanks, Pinterest!
Saturday, November 30, 2013
Picture Blog Time! More Paintings!
Here are some more photos of oil paintings I've done using the Bob Ross wet-on-wet technique:
 This was the first painting I attempted on my own. I used my lovely new paints and brushes that I got as a birthday gift from my wonderful husband. The picture was inspired by one on the Bob Ross website called "Winter Glow." (Full instructions here.) It's not exactly the same; I couldn't paint that cabin for the life of me. I am satisfied with it though, especially as a first lone attempt.
 This painting is from my final class with Melody. I desperately wanted to do this painting because I knew that it would make an excellent gift for my mother who loves lighthouses. It turned out fantastic, except that the reflection of the lighthouse doesn't quite line up with the actual lighthouse. (Shh! Don't tell anyone!) I still think it looks awesome, and I know my mother will be pleased.

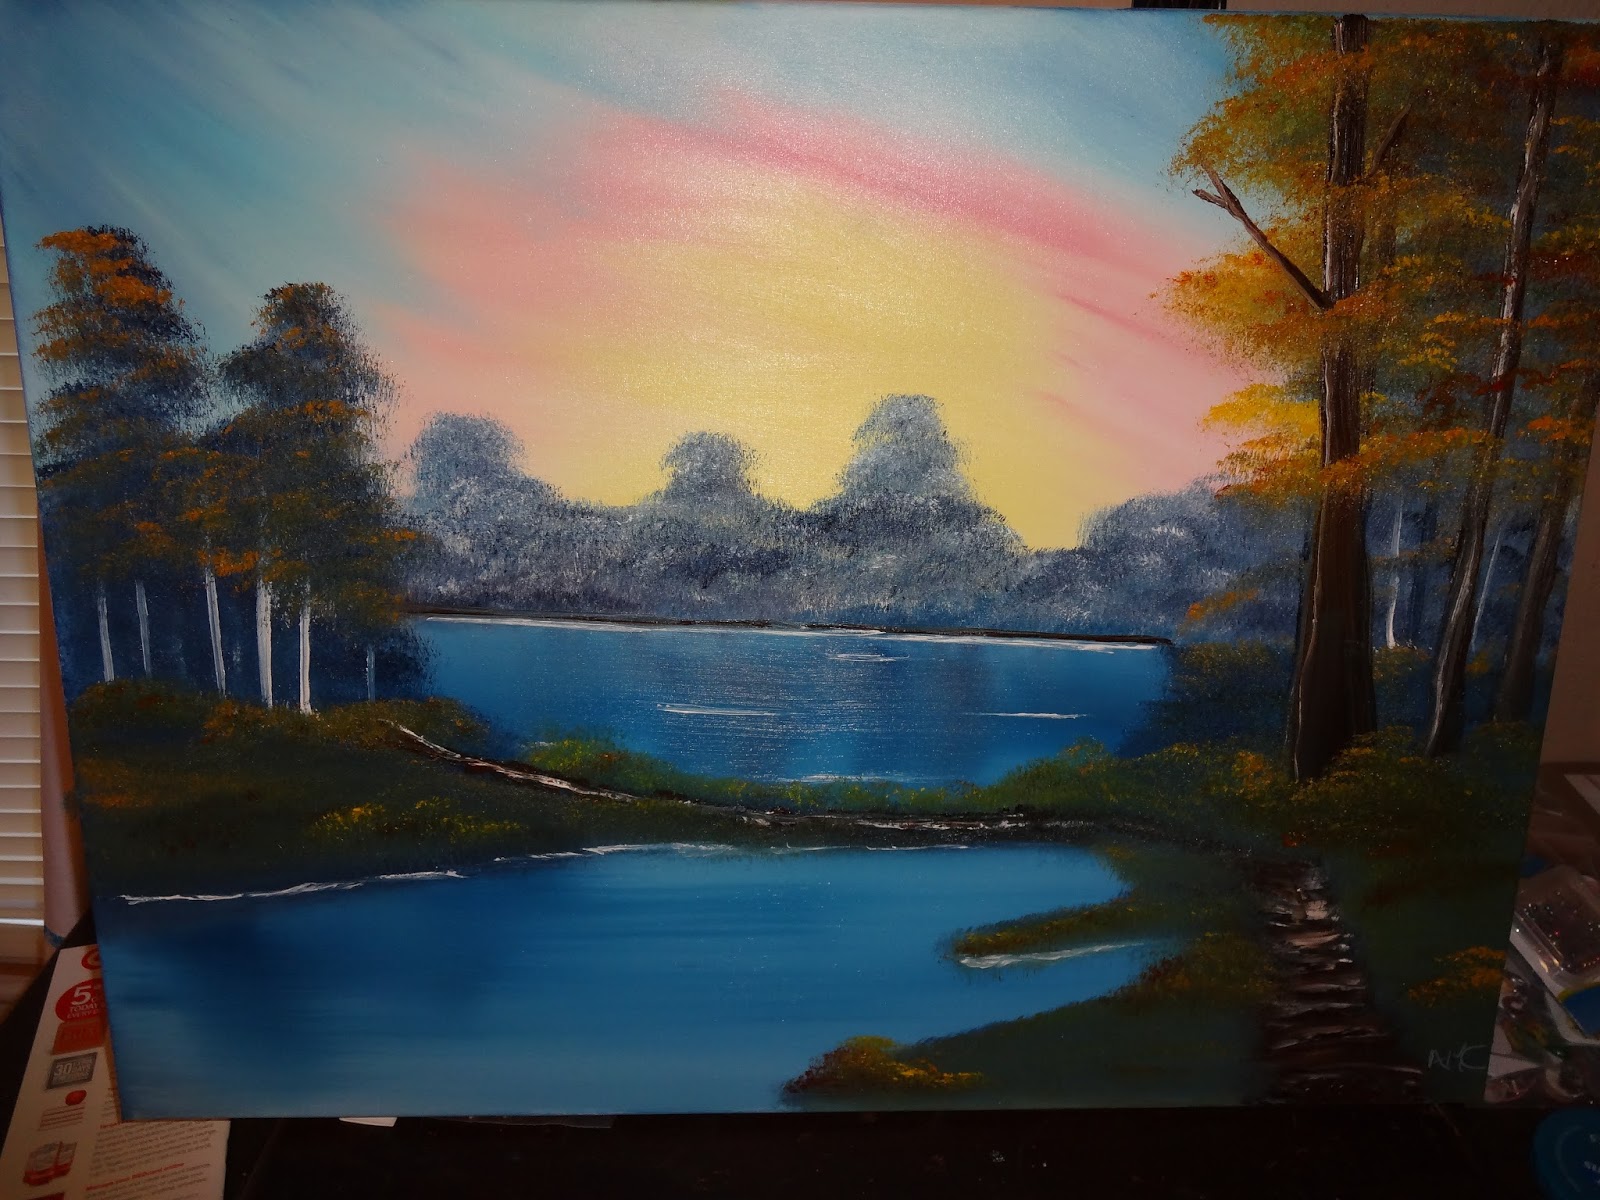
This painting started out as a seascape for my sister and her husband. However, I messed up the sky quite early on by adding too much yellow. Instead of scraping off all the paint and re-priming the canvas, I decided to roll with the yellowy sky, and this is what I ended up with - a pretty spiffy desert scene. This is a 100% Ashley original, and I like it. Like Bob Ross said, "There are no mistakes, just happy accidents."
 Here is attempt number two at a seascape painting for my sister. You'll notice the sky is much less yellow, and there's water in this one. However, the picture I wanted to paint had a beautiful crashing wave and sand dunes that I just could not get right for the life of me. So I painted some soft swells and called it good. My aunt fell in love with this one, so she's taking it home with her when she comes to visit on Thanksgiving.
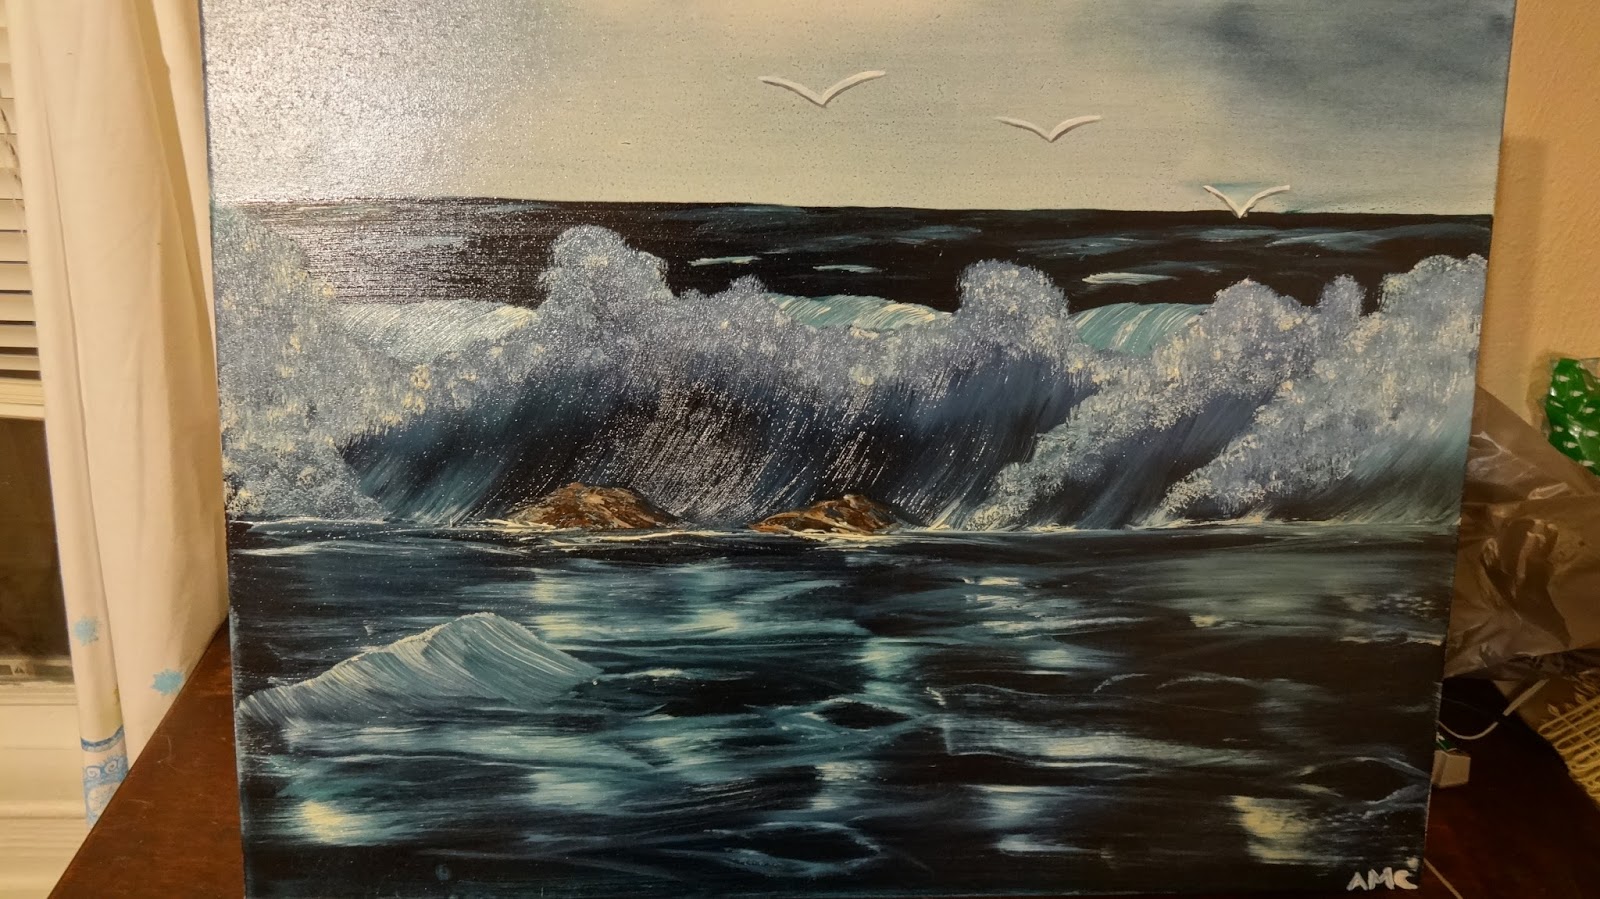
 This is the third and final attempt at my sister's seascape painting. After watching this video on YouTube, I was able to get that crashing wave down. Fortunately, I also got the dunes right on this one too. It really is just a matter of practice, I think. Trust me, you don't know how many times I scraped off bad waves before I finally got it just how I wanted. Like Bob Ross said, "Talent is a pursued interest. Anything that you're willing to practice, you can do."
And just for fun, I'm going to share this video with you. If you have time, check out the rest of the PBS remix videos. Catch you later!


This painting started out as a seascape for my sister and her husband. However, I messed up the sky quite early on by adding too much yellow. Instead of scraping off all the paint and re-priming the canvas, I decided to roll with the yellowy sky, and this is what I ended up with - a pretty spiffy desert scene. This is a 100% Ashley original, and I like it. Like Bob Ross said, "There are no mistakes, just happy accidents."

 This is the third and final attempt at my sister's seascape painting. After watching this video on YouTube, I was able to get that crashing wave down. Fortunately, I also got the dunes right on this one too. It really is just a matter of practice, I think. Trust me, you don't know how many times I scraped off bad waves before I finally got it just how I wanted. Like Bob Ross said, "Talent is a pursued interest. Anything that you're willing to practice, you can do."
Monday, November 25, 2013
Forming Rhok'delar, Longbow of the Ancient Keepers - Part 2
For the beginning of this project, see: Forming Rhok'delar, Longbow of the Ancient Keepers - Part 1
 Long has my epic bow sat unfinished, but no more. When I left off in part one, I was waiting for the paper strips to dry. The next step was to cover the bow in CelluClay. The final product was very hard and strong without being too heavy, but even thought the box said it could be sanded, sandable it was not. Either that, or I have the crappiest sandpaper ever made, because when I went to sand the CelluClay, it knocked the sand off my sandpaper. I did have better luck using steel wool to sand the bow, but in the end, what I had to do was cover the entire bow in a layer of spackle, then sand that down to get a smooth finish. I like to use the kind that starts out pink and turns white as it dries, so you know exactly when you can move on to the next step.
 After the spackle was smoothed and dusted, it was time to paint. Faux painting is always a trial-and-error process for me, even though I've been doing it for years. I used the 3D model viewer on WoWhead to try to get the colors and textures as close to in-game as possible. After it dried, I coated it in Mod Podge to seal it. Once that was done, all that was left was to wrap the vines I'd made around the bow and glue them on. I didn't take any pictures of the vine-making process, but it was fairly simple. I took some newspaper

pages and twisted them together into rope in the length that I needed. Then I wrapped up the newspaper rope in some green floral tape. I didn't want it to be all one color, so I dabbed on a contrasting green acrylic paint to add interest. Then, I wrapped around some faux-floral morning glory garland. Morning glories are closest to the type of flower that blooms on Rhok'delar, so that's what I used. Here's the final finished product:

I wasn't overly pleased with how this turned out, to be honest. I felt it looked rather cartoonish. I think my painting skills were taking a holiday. My sister-in-law and her husband both disagreed with me, though. They said it looked fantastic. Perhaps I'm being my own worst critic, but I think I can do better. What do you think?
 Long has my epic bow sat unfinished, but no more. When I left off in part one, I was waiting for the paper strips to dry. The next step was to cover the bow in CelluClay. The final product was very hard and strong without being too heavy, but even thought the box said it could be sanded, sandable it was not. Either that, or I have the crappiest sandpaper ever made, because when I went to sand the CelluClay, it knocked the sand off my sandpaper. I did have better luck using steel wool to sand the bow, but in the end, what I had to do was cover the entire bow in a layer of spackle, then sand that down to get a smooth finish. I like to use the kind that starts out pink and turns white as it dries, so you know exactly when you can move on to the next step.

 After the spackle was smoothed and dusted, it was time to paint. Faux painting is always a trial-and-error process for me, even though I've been doing it for years. I used the 3D model viewer on WoWhead to try to get the colors and textures as close to in-game as possible. After it dried, I coated it in Mod Podge to seal it. Once that was done, all that was left was to wrap the vines I'd made around the bow and glue them on. I didn't take any pictures of the vine-making process, but it was fairly simple. I took some newspaper
pages and twisted them together into rope in the length that I needed. Then I wrapped up the newspaper rope in some green floral tape. I didn't want it to be all one color, so I dabbed on a contrasting green acrylic paint to add interest. Then, I wrapped around some faux-floral morning glory garland. Morning glories are closest to the type of flower that blooms on Rhok'delar, so that's what I used. Here's the final finished product:

I wasn't overly pleased with how this turned out, to be honest. I felt it looked rather cartoonish. I think my painting skills were taking a holiday. My sister-in-law and her husband both disagreed with me, though. They said it looked fantastic. Perhaps I'm being my own worst critic, but I think I can do better. What do you think?
Saturday, November 23, 2013
A Tribute to Northville in Pictures
Now that the sale of our NY home has concluded, I thought it appropriate to pay homage to the little town that taught me to love snow, New England autumns, and Stewart's ice cream. This was the place where my daughter was born, and my beloved German Shepherd died. I realized a little too late how great a place this was, but I'm glad I got to experience Northville even for a little while.
 |
| Our happy home |
 |
| Great Lake Sacandaga |
 |
| Fall beauty in town |
 |
| White Christmases |
 |
| Snow dogs |
 |
| Backyard fall fun |
Wednesday, November 20, 2013
Halloween as a Troll
 At long last, you get to see how our Halloween costumes turned out. This is my daughter and me just before heading down the street for trick or treating. I'm pretty pleased with how it all turned out. We both got several compliments on our outfits, and a few people even asked to have their photos taken with us. (Not sure what happened during the uploading process that gave this picture a sepia hue, but I assure you it didn't look like this on my camera when we took it.) We forgot to put my little one's crane feet on in this pic, but I'll show one with the feet a little later. I will say that my daughter's costume was probably the simplest, yet most fancy-looking costume I've ever made. The hardest part of putting together her outfit, aside from multiple hot glue burns :(, was sorting through all the feathers I bought to weed out all the ones that were damaged, too small, or not the right shape. After that, it was simply a matter of cutting out the wings, mask, and feet, then attaching feathers, and adding some Velcro to make it wearable. The green leotard was purchased from welovecolors.com/, and the leggings she already had. Going to the bathroom was a little bit of a challenge for her in this costume, but with some careful planning, we were able to avoid any potty-related fiascoes.

In the picture directly below, you can see a picture of not only my impatient trick-or-treater's sad face at being told to wait, but you can also see the bird feet that I made from craft foam. They had a little strap underneath that slipped through her Velcro shoes to keep the the feet from spinning around on her ankles.

Pretty ingenious, if I do say so myself!
 Now, onto my costume. I'll go ahead and apologize for what's probably the worst archery stance in the history of the world. But hey, you can see I finished Rhok'delar! Stay tuned for part two of the tutorial on that, my friends. First of all, you're probably saying, "Hey! That isn't the Amani Mail set you said you were going to make!" You'd be right, it isn't. What it is, is the Brackwater Mail recolor set (although I forgot to wear the bracers and feet, much to my chagrin). I'm still wearing the Pauldrons of the Furious Elements, though, so there! These changes in the costume were made mainly because of the lack of time. If you've been keeping up with my blog, you'll know that I've been busy packing, selling my house, and visiting family all before a big cross-country move. Now, I honestly can't really blame all that, because I started working on this costume in January. The real issue was that all this cropped up after I decided to procrastinate. In the future, I'll be making a post about the lessons I learned while trying to finish this costume last minute. This was my first attempt at a costume project of this magnitude, and while it did turn out nice, it could have been so much better if I'd been working at it all along like I should have been doing. At any rate, hindsight is 20/20, and speaking of vision, let me give you a better look at the individual parts of my costume.
 The first picture is one of my bracers (which I'm still kicking myself for forgetting to put on). The details you see here like the metal studs and rings were on each piece of my "armor." At a distance, it looks like studded leather over scale mail. The second picture is of my wig. I'm showing the side view of it, because all the pictures taken of me on Halloween were from the front, and the great styling of this wig went unnoticed because of it. You really couldn't see the braids or the overall shape of the mohawk, which is kind of a shame,
 These are my pauldrons, and I am very proud of them. I feel they look just awesome. I can't give a step-by-step tutorial for these since I didn't take pictures throughout the creation process, but I will put up a basic how-to for anyone who's interested in attempting your own cosplay armor. There are some things I'd do differently if I had to do them all over again, but I'll talk about that in a future post.
So there you have it, folks! My transformation into Leah for Halloween was successful. My sis-in-law said we were the talk of the neighborhood, so I guess there's something to be said for that! TTFN! Ta-ta for now!
Monday, November 18, 2013
I Haven't Died
I'm still here! I know you guys are dying to know how my family's Halloween costumes turned out this year, but I'm telling you, I haven't stopped moving long enough to get the photos out into the blogosphere. Since I have a few minutes, let me tell you about what's going on in my life.
Back in April, my husband applied for a new job. It's clear across the country from where we live, but it's better pay, better work, and near our target area for our eventual secluded hobby-farm dream home. Well, months rolled by, and we just assumed that since we hadn't heard anything that he wasn't getting hired. Fast forward to August, and we got a call for him to come interview. In September, he was offered the job. At the beginning of October, my husband headed on out to start his new job and try to find a place for us to live. Meanwhile, I was still back at our old home packing up our stuff to put into storage. The plan was I would store all our stuff and then go stay with our relatives while waiting for my husband to find us a home out there.
Shortly after we got the call for the interview, we also got a call from our real estate agent in NY. The house that we'd been trying to sell for three years finally had an offer. There were negotiations and paperwork aplenty.
Since my daughter and I have been staying with family, we've been constantly running errands and visiting family. It feels like I haven't really had time to catch my breath. At any rate, we're scheduled to move into our new home with my husband in early December. Perhaps then I can rest. Who am I kidding? Christmas is approaching!
Anyway, that's what's been going on with my life. If you don't see me around, I'm probably running around all over creation like a chicken with my head chopped off. However, I promise as soon as I get a minute or two to organize my photos and my thoughts, I will post about Halloween, my paintings, and my craft projects. Until then, tootaloo!
Tuesday, October 1, 2013
Why I Make my Child's Halloween Costumes
 A couple of years ago, I started making my daughter's Halloween costumes. When she was one, I made a hat with antennae to go with her off-the-rack ladybug costume. It got more compliments than the whole outfit. When she was two, I made her a flower costume. Last year, she went as her favorite feline, our cat Pixie. This year, I will be making a green crane costume for her. Making the little one's costumes has become something I look forward to, because it provides the unique challenge of bringing her wishes to life.
Three years ago when I started down this road, I imagined I would save money by doing it all myself. I quickly discovered this was not the case. Often, the cost of materials adds up quickly, especially if fake fur, feathers, or fabric is involved. Then there's the time-suck of making the costume. I tend to spend several hours drafting a plan for the costume, and even more time in the execution. In the end, it would often be simpler if I had just gone down to my local big box store and purchased a ready-made costume.
So why do I do it?
I love my child. Let me clarify: every mom has something she's good at, a unique way to express love to her


It's extremely satisfying for both my child AND me. I get an enormous sense of accomplishment when I finish a costume. It also makes me happy to see just how excited my little one gets during each stage of the creation. For her it's satisfying because she gets a say-so in the whole process, from concept to completion. As a four year-old, she has a lot of decisions made for her every day. This is something that's all her own, and it makes her very proud.
So that's it then. I encourage you to give it a try sometime. Even if you don't feel like you're the crafty type, there are plenty of fool-proof plans on the internet that can likely inspire you. (Check out my Halloween board on Pinterest for starters!) Watch out though; you might just get hooked!
Tuesday, September 17, 2013
Darkspear Tabard

My little one's Wandering Greenback costume is nearing completion, and I'll have some pictures of that up soon.
Tomorrow is another painting class, and this month, we're doing a lighthouse. What a great present that will make for my mother this Christmas!
Well, that's all for now. Until next time, see ya!
Tuesday, September 10, 2013
The Siege of Orgrimmar
Today is the day. Long have we bided our time, and now the final straw has been drawn. Patch 5.4 launches today, and with it, the Siege of Orgrimmar:
\
Of course, there will be other content in 5.4, which Lore tells us all about here:
Down with Garrosh! For the Horde!
Tuesday, September 3, 2013
I was Completely Insane, but I'm Better Now
Take a look at the Shifting Camouflage Pants that I'm using as the basis for my Halloween costume. You see that grey area that looks like scales? Yeah, I saw it too. When I did, I had the bright idea to make some and sew them all on by hand. I even got a few done:


They look great don't they? Then I began to sew them onto my pants, and I realized just what a mistake I'd made. They looked awesome while laying flat, but they were going to have to cover my contours and be able to move with me. I just don't think they would be able to do that. This is not to mention the scale of the entire project. I was going to have to make hundreds of these buggers and sew them all onto not just my pants, but my gloves and boots as well. Given that I've been procrastinating a lot lately, I didn't think there was any way I'd finish in time, so the scales have been packed away for use on another project.
My next idea for achieving the look of scales wasn't much better. I had an old pair of Halloween fishnet stockings and thought, "Wow, fishnet stockings layered over my pants would look like scales. That should work, and it'll be simple." LOL. While the look was right, no matter how I shifted, pulled, pinned, or tucked, I just couldn't get the pants to stop wrinkling under the tights. Even if I did manage to get everything looking just so, as soon as I took a step, it was all undone. So, that idea got scrapped too.
Frustrated, I went to bed last night wracking my brain for a way to get the look I need. I seriously considered just forgetting the scales and wearing plain grey pants, but my detail-oriented nature couldn't abide the thought. Finally, I had my light bulb moment. "Why not draw them on?" I thought. And draw them on I did:

Sometimes, the simplest answer is the best answer.
Thursday, August 29, 2013
Painting Bob Ross Style
It's been quite a while, my lovelies. How have you been? I've been busy! Lots of goings on here, but today I want to tell you about the classes I've been taking.
Four months ago, I stumbled upon a display at the front of my local Hobby Lobby. It featured a large, beautiful seascape oil painting and a few flyers for an art class that was going down at the end of the month. Fortunately for me, the class was happening on a Thursday, right when my little one would be attending preschool, so I decided to sign up. That was three classes ago now, and I haven't looked back. I love oil painting!
I have a wonderful instructor, Melody Panneton. She is certified to teach Bob Ross's wet-on-wet technique (you know, the "happy little trees" guy?), and I'm certain she can help anyone paint something awesome even if they've never held a brush before.

I've painted before, but it's all been self-taught and mostly with craft acrylics. I've learned all about adding depth, how to use a pallet knife, how to paint tree branches, and most importantly, how to step away and leave things alone instead of constantly fussing over my picture.

I find oil painting relaxing, and have decided to take it up as a new hobby at home. My husband has been very encouraging; he recently got me an oil painting starter kit for my birthday. For now, I'll be using painting instruction books for inspiration, but I'm hoping after I get a little more comfortable with my abilities, I'll be able to create my own art.
Well, that's all for this week, my lovelies. Come back soon for some more updates from your happy little painting apprentice!
If you want to see more of Melody's classes, check out her Facebook page and take a look in her albums. I'm pretty sure I'm in one of them!
Four months ago, I stumbled upon a display at the front of my local Hobby Lobby. It featured a large, beautiful seascape oil painting and a few flyers for an art class that was going down at the end of the month. Fortunately for me, the class was happening on a Thursday, right when my little one would be attending preschool, so I decided to sign up. That was three classes ago now, and I haven't looked back. I love oil painting!
 |

I've painted before, but it's all been self-taught and mostly with craft acrylics. I've learned all about adding depth, how to use a pallet knife, how to paint tree branches, and most importantly, how to step away and leave things alone instead of constantly fussing over my picture.
I find oil painting relaxing, and have decided to take it up as a new hobby at home. My husband has been very encouraging; he recently got me an oil painting starter kit for my birthday. For now, I'll be using painting instruction books for inspiration, but I'm hoping after I get a little more comfortable with my abilities, I'll be able to create my own art.
Well, that's all for this week, my lovelies. Come back soon for some more updates from your happy little painting apprentice!
If you want to see more of Melody's classes, check out her Facebook page and take a look in her albums. I'm pretty sure I'm in one of them!
Tuesday, August 6, 2013
A Tale of Love and Loss: Ashley and the Tacky Mirror
Life has been hectic for me lately! A couple of weeks ago, my husband was contacted about interviewing for a job in Montana. Shortly after that, we had a visit from my parents. Then our real estate agent contacted us about an offer to buy our house that we've been trying to sell for three years. At the moment, we have all sorts of irons in the fire, so no long posts for me today. Instead, I will present you a cautionary tale about procrastination.
While my parents were visiting, my mom requested that we visit the Hobby Lobby in town. Mom loves Hobby Lobby, but she doesn't have one very close to where she lives, so this was a special treat for her. Once inside, my mom, my daughter, and I began strolling the isles on the hunt for treasures. To make room for the Christmas items (don't get me started on that, I don't feel like climbing up on my soapbox tonight), they had put several items on clearance, including several decorative mirrors. It wasn't long before I spotted it - the gaudiest, God-awful mirror I'd ever seen. It was large, oval, and surrounded by ugly brass circles with obviously fake gems in their centers. What was worse, you could just sense the cheapness about it. Boy, I wish I had taken a picture to show you all. I called my mom's attention to it, and together we made fun of how hideous it was. On a whim, I checked the price tag. They had originally wanted $200 for this atrocity, but it had been marked down to only $25.
I began to walk away when I felt a change come over me. Mirrors are pricey, and $25 wasn't a bad price for a mirror that large, even if it was ugly enough to be tried for crimes against humanity. I glanced back. On a second look, I felt the mirror somehow had a kitschy charm to it. Honestly, the mirror's frame had a good shape; it was only the terrible brass and plastic gems that made it unattractive. I said to my mom, "Actually, I think I kind of like that tacky old mirror. You know, you could spray paint that frame and it would probably be pretty nice." She nodded in agreement. However, being my normal thrifty self, I said, "But I don't really need it."
Unfortunately, the more I thought about it, the more I really did want the mirror. After wrestling with the desire for a week, I stopped in to see if the mirror was still there. Alas, it was not. So here's my story's moral - if you really like something on clearance, don't wait! Snatch up that ugly mirror and make it yours!
Catch you next time!
Tuesday, July 9, 2013
Patient Zero
Oh, my lovelies, it's been a long while since I posted for you. I recently caught the plague and have been fighting transformation tooth and nail. Not really, but that's what it felt like. Last Monday night, I began to have a sore throat. By Thursday, I had the full on plague - sore throat, runny and stuffy nose (I have never understood how those two conditions could exist simultaneously, but oh well), weakness, coughing, fever of 102. By Saturday, I was coughing so often that I couldn't really sleep more than a couple hours at night. Medicine did not help. Here it is now Tuesday, and I don't want to jinx it, but I think I might pull through. I'm still coughing, but not as much, and the coughs are productive (just what you wanted to hear today, I'm sure). My nose is still acting up, but I can kind of breath through it again! It may seem ridiculous that a cold almost laid me low, but to be honest, this is the first time that I've actually been truly sick in quite a while.
At any rate, the near week of feeling like the walking death has left me with a mountain of housework to catch up on, so there won't be any bloggy goodness from me for another couple of days at least. Sorry about that, guys. Well, anyway. Catch you later!
At any rate, the near week of feeling like the walking death has left me with a mountain of housework to catch up on, so there won't be any bloggy goodness from me for another couple of days at least. Sorry about that, guys. Well, anyway. Catch you later!
Thursday, June 20, 2013
Another WoW Post (Contains Spoilers)
Man, it's been a month since I last posted! Time has just flown by for me lately. I wish I had my stuff together to show you all the neat things I've been making, but I don't, so today you're getting another post about WoW. Last time I blogged, I was excited about patch 5.3 and the continuation of the story of the Horde rebellion. With the Siege of Orgrimmar on the test realms, I had some predictions/hopes for the upcoming coup d'etat. However, after reading Wowhead's latest report on the PTR, it's clear that Blizzard doesn't intend to grant me my silent wishes. (Warning, spoilers lay ahead.)
Let me start by saying that I don't like Garrosh. He's woefully arrogant, brash, and power-hungry. However, that didn't stop Thrall in all his wisdom from naming him Warchief. Why? Surely Thrall saw all that, and he didn't just promote Garrosh because he's the son of Grom and rightful heir of the Warsong Clan? No, I really think Thrall appointed Garrosh as Warchief of the Horde because he saw potential for true greatness and leadership in him.
WHAAATTT!?
Hear me out; there are several Horde quests where you get to interact with Garrosh and see that he isn't just a mindless warmonger. The first quest I'll mention is The Warchief Cometh, where Garrosh warns Sylvanas, albeit tactlessly, about the dangers of the path she is treading with the Val'kyr. Another quest that comes to mind is To Be Horde in Stonetalon Mountains. When Overlord Krom'gar sends out that bomb, Garrosh tells him that murdering innocents is not honorable, that the end does not justify the means. As a rule, Garrosh is against total war, as is evidenced by the fact that he forbids Sylvanas to use the plague. He has access to a chemical weapon that would grant complete victory over the Gilneans, yet he does not take advantage of it. Once again, in Breath of Darkest Shadow, he makes the distinction between honorably defeating one's enemies and straight-up slaughter when he tells Ishi, "Control your hatred, Ishi. There is killing, and then there is murder."
Okay, so Garrosh isn't all bad. That doesn't make up for the atrocities he's committed so far this expansion, so what's the point? My point in showing you all this is to set you up for how I believe the Siege of Orgrimmar should end. Garrosh is the son of Grom Hellscream, who as you know, was the first orc to partake of the demon blood that corrupted the original Horde. Along the way, he realized his mistakes, and gave his life to free the orcs from the blood curse by defeating the demon Mannoroth. I think it would be fitting if, near the end of the Garrosh encounter, Garrosh overcomes the hold the Sha has on him, and sacrifices himself to help the raid party defeat the Heart of Y'shaarj. That way Garrosh, like his father before him, could be redeemed and remembered as a hero instead of dying as a villain. It would have some pretty awesome symmetry, I think. However, that's just not going to happen, at least if the audio files from the PTR are to be believed. With his dying breath, Garrosh still claims that ruling the world is his destiny. The audio files seem to reveal that he has no remorse for what he's done. I guess at least I can hold out hope that he's going to drop a legendary Sha-touched Gorehowl or something. That would be spectacular, and it would help make up for the injustice of having Gorehowl drop as a lowly purple in Kara.
Another disappointment that I have about the upcoming raid is that we have to fight General Nazgrim. He turned a blind eye to the secret missives that Vol'jin was sending me during the Dominance Offensive campaign. While he never really gave his consent, he certainly did nothing to stop me from aiding Vol'jin in setting up a rebellion. I'd really hoped that he'd be fighting along side us to overthrow Garrosh, but instead, he stands between us and the Warchief. I've gotten pretty attached to Nazgrim, as attached as I can be to a fictional character, anyway; I've fought beside him for three expansions now. I watched him get promoted from Sergeant to Legionnaire to General, so it makes me sad that he has to die. I'll be honest, I nearly cried when I heard the soundbite from his death, where he tells us that we fought an honorable fight, and that he was glad that he died by our hands. If I ever participate in the Siege, I will surely do a /mourn for Nazgrim.
But anyway, enough with the WoW talk for now, I have stuff to do! TTFN, ta-ta for now!
Tuesday, May 21, 2013
Escalation
 |
| Leah wearing her Darkspear Pride. |
Can you tell I'm a little excited? Patch 5.3 launches today, and I'm chomping at the bit to play the next part of the story that is unfolding. I can't wait to see the outcome of the campaign against Garrosh. I can only hope that the culmination is every bit as satisfying as I envision it will be.
Also on the WoW front, my little one has informed me that she wants to be my bird. Leah's current pet is Ichabod, a Wandering Greenback Crane from the Jade Forest, and that's what my little one wants to be. I'm thinking of putting together a crane costume inspired by Uma Thurman from Even Cowgirls Get the Blues, but of course with my own little twist. As long as she doesn't change her mind, I'll finally get that mother/daughter costume opportunity I've always wanted. Oh happy day!
In other news, I've got some lovely pictures to share with you just as soon as I upload them to my computer. My nephew recently had his fifth birthday party with a How to Train Your Dragon theme, and all the dragon training games were a smashing success with our little Vikings. My mom-in-law's crafty brain is responsible for all of the festivities, but I'm proud to say that I did have a hand in drawing the Hideous Zippleback for the bean-bag toss. Check back later for the full report.
Tuesday, May 7, 2013
Sleepy Posting
I'm drowsy blogging today, folks. I stayed up a whee bit too late while gaming last night, then got up a whee bit too early to take my little one to preschool. Bare with me.
A little while back I mentioned sprucing up my front porch, and today, I'm sharing the pics with you. This is what my porch looked like before:


A little while back I mentioned sprucing up my front porch, and today, I'm sharing the pics with you. This is what my porch looked like before:

Cute, but not a lot going on. There was only seating for two, and that seating kept blowing over in the wind. Behold, the after:


There's now comfortable seating for at least four, maybe more if people don't mind getting friendly. Best of all, I now have more storage space, because all of the benches open up. The folding Adirondack chairs have been relocated to the fire pit so we can have a place to sit on bonfire nights. Magically, they've stopped falling over; I guess they didn't really want to be on the porch. I stole some ideas from Pinterest - namely, spray-painting over my old green pillows to match my new blue color scheme, and that little plant stand made from a tomato cage. I also made my own version of that adorable pillow from Etsy using burlap, acrylic paint, and plastic grocery bags as stuffing. See a closeup here:

Now my porch is all ready for lovely spring and summer days. That is, after I wash the pollen off everything!
Subscribe to:
Posts (Atom)