Hey, guys! It's the week before Easter, and I'm busier than a one-armed paper hanger, but I decided I'd take a minute while my lunch is cooking to bring you a little grammar lesson. I've been seeing the improper usage of "I" and "me" going around quite a bit, so I want to share with you a hint that is very helpful. In situations involving multiple people where you want to know whether you should use "I" or "me" in a sentence, always think of how you would answer the question if you were only answering for yourself. In cases where you're alone and you'd answer "I," use "I" when including multiple people also. The same goes for "me;" if you're alone and would normally answer with "me," then use "me" when referring to multiple people. Let's clarify with a couple of examples:
Example 1, Using "I":
Kim asks, "Who is going to the store?"
You reply (when speaking for yourself alone), "I am going to the store."
OR
You reply (when speaking for yourself and someone else), "Jan and I are going to the store."
Example 2, Using "me":
Kim asks, "Whose dog is this?"
You reply (when speaking for yourself alone), "It belongs to me."
OR
You reply (when speaking for yourself and someone else), "It belongs to Jan and me."
Pro Tip: Always include yourself last in these situations, it's just plain polite (e.g., "Jan and I," not "I and Jan").
There you go. My grammar may not be perfect, but I do try, and now you can try a little harder too!
Happy Easter, everyone!
Thursday, March 28, 2013
Tuesday, March 19, 2013
Blah Weather
Today after a dreary morning, it's finally sunny and nice outside. Gosh, I really wish we could have a few consistently sunny, warm days. I tell you, the rain and cold has got me feeling pretty blue, and the peeks of sunshine have been a cruel tease. I want to sip sweet tea on my front porch, dammit! Speaking of which, Pinterest has once again been a source of inspiration for me:
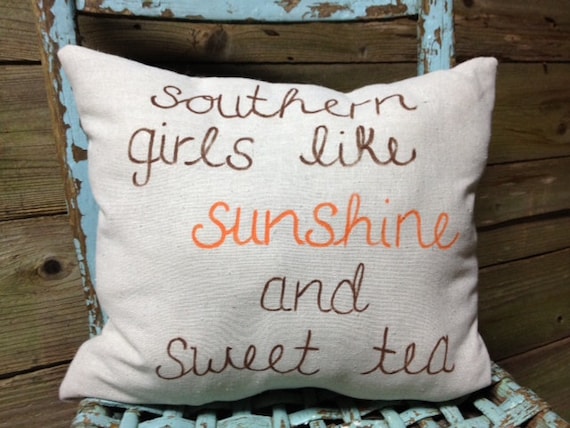 Someone pinned this cool, handmade pillow you can find on Etsy. I like the saying, and I'd like to do one of my own with a little different design on some burlap. If you order this pillow, you can customize it with your own colors and sayings too. Actually, the whole shop has some pretty awesome stuff. I'm going to make a pillow like this and pair it up with some of these outdoor pillows from Target:

I'm really feeling the turquoise right now, you know? It's so bright and happy. Anyway, that's it for now. I'll post some pics of my new porch furniture when I get it all done. Until then, tootles!
Friday, March 15, 2013
Potatoes and Tusks
 |
| Fierce! |
This week we've been blessed with beautiful weather. I have to tell you, after the crazy winter we've had, I'm thankful for some calm spring-like days. All this has got me looking outside in anticipation of gardening. A few days ago, my little one and I started some tomatoes, tomatillos, sweet and hot peppers, and zucchini seeds indoors. I was curious how this would go because the tomato seeds were some I saved myself a couple of growing seasons ago, and the peppers and zucchini are close to 3 years old. I honestly didn't expect any of them to sprout, but sure enough, the tomatoes and zucchini are.
Yesterday, we headed outside to plant some Dutch iris bulbs in a little, neglected garden bed under our tree. I found that daffodils and grape hyacinth were previously planted there, so that was a pleasant surprise. The grape hyacinth seems to be making a run for it though, because I see blooms popping up in the grass up to ten feet away from the bed. I weeded, put down ant killer and fixed the rock ring around the bed. We also planted some zinnia seeds in my umbrella stand planter and began a potato tower. I have a lot of plans in store for my yard, and a lot of work ahead of me to get it done, but I'll be glad to be outside. Who knows, maybe I'll even get a tan this year.
Thursday, March 7, 2013
Poppin' Tags and Fletchin' Arrows
"I'm gonna pop some tags, only got twenty dollars in my pocket..." If you haven't heard this song, you need to. This song has become my theme song. Check out the radio edit here:
Why have I made Macklemore's "Thrift Shop" my theme? On my last trip to South Carolina, the mom-in-law and I made a trip to our favorite thrift store, where I scored four over-sized tees for 99 cents each. I altered the first one to make a cinch tee. I also made a skirt, and from there, it kind of snowballed. I made another skirt, then I altered two shirts I already owned, then I made several repairs to torn clothing that had been sitting in my project bin for months. Since then, I've been opening up my Sewing and Fabric Projects board on Pinterest and saying to myself, "What can I do today?" I think refashioning thrift store finds might just be my new hobby.
Ultimately, that's not what I want to tell you about today. In my last post, I promised to tell you about a part of my Halloween costume that's also a Valentine's Day friendly project. I know Valentine's Day is over and this post is way overdue. I apologize for that; life got in the way and I had other things to attend to. On the bright side, if you like this idea, you have a whole year to get it ready before Valentine's rolls around again! As you know, my WoW toon Leah is a hunter, and so my project was making arrows!

Next, I looked for a user-friendly tutorial that would help me make realistic fletching for my arrows. I came across an article on primitiveways.com called "Fletching by Hand" that ended up giving me all the information I needed. I didn't follow the instructions to the letter, well, because I never really do. I'm a maverick like that. Besides, all I wanted was the basic idea for making an arrow that looks functional. For my fletching, I picked up some natural colored duck feathers from the craft store, and I split them down the quills with a utility knife. I trimmed them up to the approximate size and shape I wanted, then I used a dab of super glue to help hold the feathers in place while I wrapped them with dental floss. I didn't have any natural sinew, but the dental floss looked enough like it to suffice, so that's what I used. As I wrapped, I dipped my fingers in craft glue and slid the dental floss through them so it would adhere nicely without unraveling. And that's really all there is to it! Check back in the near future for my adventures in quiver making!
Subscribe to:
Posts (Atom)