Showing posts with label etsy. Show all posts

Friday, February 28, 2014

Ikea Envy and the Cost of Things

So lately I've been having a bit of what I call "Ikea envy." It is a condition where, upon seeing the cool stuff you can do with Ikea products, you feel sad and a little jealous of people who are blessed to live near an Ikea. Have you seen all the fantastic "Ikea hacks" - the ones where people take a cheap piece of furniture, such as the RAST dresser ($34.99), and turn it into something that looks like a million bucks? Seriously, if you haven't seen them, take a minute and Google it. They're insanely clever, and right up my alley. Unfortunately for me, the closest Ikea is over eight hours away in Utah, and their shipping rates are exorbitant, so I'm stuck with a creative itch I can't scratch.

At any rate, the whole reason I have this creative itch is because I've been bitten by the design bug. I guess it's just living in a new space that has me wanting a change, or it could be that I've had the same old stuff for years now and I would like something new. A lot of the things I have, while not bad, where either inexpensive things bought in a hurry, or they were hand-me-downs given to us to fill a specific need we had at the time. Combine that with the fact that quite a few of my possessions got pretty beat up in this last move, and I'm feeling the need for something different.

That being said, I can't just go out and buy all new things because my husband and I are attempting to become debt-free in the next two or three years so we can begin saving for a down payment on the dream house we want to build. I have to make what I have last for now. However, it isn't just that. More and more I'm coming to realize that all those homes that I admire on Pinterest and in the magazines aren't furnished with particle board furniture from big box stores. The homes that dazzle me most are filled with family heirlooms, lucky flea market or yard sale finds, tirelessly sought for antiques and vintage pieces, and high-end quality stuff made by people who give a damn about their craft. That's what I want, and that kind of look takes time. If I try to rush it, I'm going to end up disappointed. So for now, I'm going to bide my time, and make due with what I have. So that means getting crafty.

**WARNING: SMALL RANT AHEAD**

I'm realizing lately that I am out of touch with how much things cost in general. The other day I hit up my local home improvement store for the things I need to spruce up my nightstands, and I suffered some serious sticker shock (say that five times fast) at the price of paint. It was the same at every store I checked. I also browsed my local craft store and did some internet searching for fabric, but by the time I was done, I was ready to cry. Who pays $99 a yard for fabric?! And I love me some Pottery Barn, but I think that $40-$60 might be a bit much for throw pillows. Now if you want the real kicker, Anthropologie has these nifty rough amethyst 4x6 inch picture frames for - wait for it - $548. A frame that holds a FOUR INCH BY SIX INCH picture. If you like these frames, I'm going to tell you a secret: buy the stuff you need to make this on Etsy, it will cost you about $30, maybe $40, depending on shipping. There. I just saved you $518. Seriously though, who is buying this stuff? It isn't me, or anyone I know. And listen, I know I'm a cheapskate, but I honestly DO NOT KNOW a single person who could afford to spend five hundred dollars on a tiny picture frame. The people I know have to do number crunching if they want to buy a decent sofa or a USED car, but that's the people I know, and granted, I don't know many. It just gets me how much things can cost, and what some places consider reasonable prices. Kind of like when Better Homes and Gardens does an article on small kitchens, and the kitchens they show are bigger than my living room. I've had a 10'x10' kitchen that also served as my dining room. It truly had only enough counter space to make a sandwich, yet I cooked meals and baked desserts for a family of three in it. Until BHG shows me a kitchen like that, I'm not inclined to give them much credibility. So when I see stuff advertised as affordable home decor, I bristle up a bit when they show things it would take my husband's whole paycheck to buy.

Anyway, I'm done rambling for now. I appreciate you putting up with my musings. I promise less rant, more awesomeness for the next post. See ya!

Wednesday, November 20, 2013

Halloween as a Troll

At long last, you get to see how our Halloween costumes turned out. This is my daughter and me just before heading down the street for trick or treating.  I'm pretty pleased with how it all turned out. We both got several compliments on our outfits, and a few people even asked to have their photos taken with us. (Not sure what happened during the uploading process that gave this picture a sepia hue, but I assure you it didn't look like this on my camera when we took it.) We forgot to put my little one's crane feet on in this pic, but I'll show one with the feet a little later. I will say that my daughter's costume was probably the simplest, yet most fancy-looking costume I've ever made. The hardest part of putting together her outfit, aside from multiple hot glue burns :(, was sorting through all the feathers I bought to weed out all the ones that were damaged, too small, or not the right shape. After that, it was simply a matter of cutting out the wings, mask, and feet, then attaching feathers, and adding some Velcro to make it wearable. The green leotard was purchased from welovecolors.com/, and the leggings she already had. Going to the bathroom was a little bit of a challenge for her in this costume, but with some careful planning, we were able to avoid any potty-related fiascoes.

 Here's a closeup of the little one's mask. I got the basic idea for the mask from some pictures I found on Photoblog. The beautiful orange biot feathers as well as the dark green feather pads in the photo below were purchased from Kimonos Feathers on Etsy. I highly recommend Kim's shop; the products I got were of great quality, reasonably priced, and they arrived quickly. The wings were inspired by the DIY bird wings on Handmade Charlotte, the only difference was that I used actual feathers on my wings instead of fabric
scallops. For the tail, I basically just cut a teardrop shape out of craft foam and glued on feathers. It's important to note that if you're going to attempt a project like this yourself, you should layer on the feathers starting from the outside and working inward, just slightly overlapping each row of feathers. That way it mimics how a bird's feathers are naturally. Part of the reason I chose to finish off the wings and tail with feather pads was because I felt it made things look even more natural, with the pads acting at the bird's shoulders and rump.

In the picture directly below, you can see a picture of not only my impatient trick-or-treater's sad face at being told to wait, but you can also see the bird feet that I made from craft foam. They had a little strap underneath that slipped through her Velcro shoes to keep the the feet from spinning around on her ankles.
Pretty ingenious, if I do say so myself!

Now, onto my costume. I'll go ahead and apologize for what's probably the worst archery stance in the history of the world. But hey, you can see I finished Rhok'delar! Stay tuned for part two of the tutorial on that, my friends. First of all, you're probably saying, "Hey! That isn't the Amani Mail set you said you were going to make!" You'd be right, it isn't. What it is, is the Brackwater Mail recolor set (although I forgot to wear the bracers and feet, much to my chagrin). I'm still wearing the Pauldrons of the Furious Elements, though, so there! These changes in the costume were made mainly because of the lack of time. If you've been keeping up with my blog, you'll know that I've been busy packing, selling my house, and visiting family all before a big cross-country move. Now, I honestly can't really blame all that, because I started working on this costume in January. The real issue was that all this cropped up after I decided to procrastinate. In the future, I'll be making a post about the lessons I learned while trying to finish this costume last minute. This was my first attempt at a costume project of this magnitude, and while it did turn out nice, it could have been so much better if I'd been working at it all along like I should have been doing. At any rate, hindsight is 20/20, and speaking of vision, let me give you a better look at the individual parts of my costume.

The first picture is one of my bracers (which I'm still kicking myself for forgetting to put on). The details you see here like the metal studs and rings were on each piece of my "armor." At a distance, it looks like studded leather over scale mail. The second picture is of my wig. I'm showing the side view of it, because all the pictures taken of me on Halloween were from the front, and the great styling of this wig went unnoticed because of it. You really couldn't see the braids or the overall shape of the mohawk, which is kind of a shame, 
since Leah's hair is one of my favorite things about her. By the way, if you're wondering how I got the hair to stick up like that, I used Got2B glued spiking gel. It does what it claims to do, and it's not too expensive, so I really can't complain. Word to the wise, it's uber-gross feeling to work with, and I don't think I'd ever put it in my actual hair.


These are my pauldrons, and I am very proud of them. I feel they look just awesome. I can't give a step-by-step tutorial for these since I didn't take pictures throughout the creation process, but I will put up a basic how-to for anyone who's interested in attempting your own cosplay armor. There are some things I'd do differently if I had to do them all over again, but I'll talk about that in a future post.

So there you have it, folks! My transformation into Leah for Halloween was successful. My sis-in-law said we were the talk of the neighborhood, so I guess there's something to be said for that! TTFN! Ta-ta for now!

Tuesday, May 7, 2013

Sleepy Posting

I'm drowsy blogging today, folks. I stayed up a whee bit too late while gaming last night, then got up a whee bit too early to take my little one to preschool. Bare with me.

A little while back I mentioned sprucing up my front porch, and today, I'm sharing the pics with you. This is what my porch looked like before:

Cute, but not a lot going on. There was only seating for two, and that seating kept blowing over in the wind. Behold, the after:


There's now comfortable seating for at least four, maybe more if people don't mind getting friendly.  Best of all, I now have more storage space, because all of the benches open up. The folding Adirondack chairs have been relocated to the fire pit so we can have a place to sit on bonfire nights. Magically, they've stopped falling over; I guess they didn't really want to be on the porch. I stole some ideas from Pinterest - namely, spray-painting over my old green pillows to match my new blue color scheme, and that little plant stand made from a tomato cage. I also made my own version of that adorable pillow from Etsy using burlap, acrylic paint, and plastic grocery bags as stuffing. See a closeup here:

Now my porch is all ready for lovely spring and summer days. That is, after I wash the pollen off everything!


Tuesday, March 19, 2013

Blah Weather

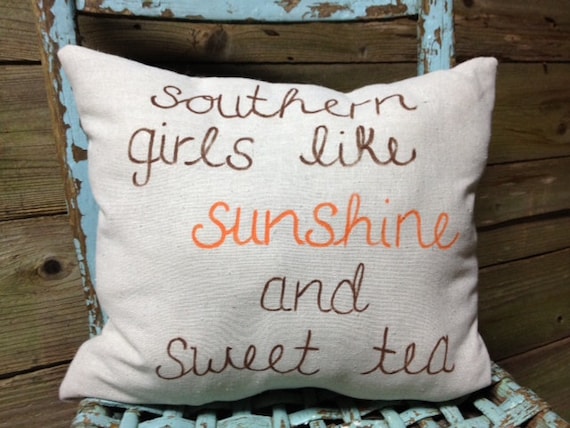
Today after a dreary morning, it's finally sunny and nice outside. Gosh, I really wish we could have a few consistently sunny, warm days. I tell you, the rain and cold has got me feeling pretty blue, and the peeks of sunshine have been a cruel tease. I want to sip sweet tea on my front porch, dammit! Speaking of which, Pinterest has once again been a source of inspiration for me:

Someone pinned this cool, handmade pillow you can find on Etsy. I like the saying, and I'd like to do one of my own with a little different design on some burlap. If you order this pillow, you can customize it with your own colors and sayings too. Actually, the whole shop has some pretty awesome stuff. I'm going to make a pillow like this and pair it up with some of these outdoor pillows from Target:
I'm really feeling the turquoise right now, you know? It's so bright and happy. Anyway, that's it for now. I'll post some pics of my new porch furniture when I get it all done. Until then, tootles!

Thursday, August 2, 2012

Sorry So Late

I bet you thought I'd forgotten about you this week. Never fear, I have not. No, instead I've been busy recovering from a weekend at my husband's family reunion by moving stuff to our new rental. So yeah, that craft blog I've been promising - I think I'm just going to break it up into several small blogs. Let's face it, my picture blogs are pretty long aren't they? This way, it'll be more convenient for all of us.

With that said, here's what I want to show you this week:

This is a wreath I made using jute twine, some wire, old jeans, and three vintage costume brooches that belonged to my granny. I started out with the intent to make something like a wreath I saw, where else, on Pinterest. The wreath is actually for sale on Etsy via TheCreativeGypsy's shop, but I thought, "I'm pretty crafty, let me try my hand at this." So I started wrapping the wreath with jute twine and was about to make the linen flowers when I saw this tutorial for denim flowers on Pinterest. The center beading looked so much like my granny's brooches that I changed my plans for the wreath right then and there. See, I love the old costume jewelry that my granny gave me, but it's not my style for wearing, so I've been looking for some way to incorporate it into something that I could see every day and get enjoyment from. Behold, my wreath! I just love it! It's rustic with a bit of glam. I'm sure the girls at Mary Jane's Farm would be proud. But I didn't stop there - oh no. See, in my granny's box of vintage jewelry was also a pair of clip-on earrings:


So I made myself some flowers that never die. They look just lovely in my milk glass bud vase. So just remember, if you've got something that means a lot to you, but all it's doing is cluttering up your space, turn it into something new. Happy crafting!