Monday, February 4, 2013

Just a couple of things

This week's post will be a fairly short one because we have company. My father-in-law is visiting all the way from sunny San Diego. It's been almost two years since the last time we saw him, so my little one is having quite a nice time with Grandpa.

Most of last week was spent getting ready for company, and that included reorganizing the little one's room to give her more space and better access to her toys. We used to keep all her toys in two big plastic buckets, which was a nightmare. To find anything, she would have to dump everything in the buckets out on the floor. The solution was re-purposing three sets of black, rolling plastic carts with the clear drawers. I had been keeping my craft items in them, but that wasn't working out, so I relocated my crafts to the bookshelves in the hallway. Then I cleaned out the carts and gave them each a coat of brightly-colored spray paint, and then loaded them up with my daughter's toys. Now she can see what's in each drawer, and she has more floor space to play. I can also get into her closet without having to move buckets around too. With my little one's permission, her big buckets now hold my fabric stash and add some cheery color to my craft area.

I also finished up two craft projects that I had been meaning to do. The first was a tin sign that my mother gave me that said, "Laugh" on it. I love metal signs, but I'm not a big fan of the "Live, Laugh, Love" stuff, so I thought I'd give it a new identity. Now it sits on my front porch, and it looks like this:


The first time I saw a sign like this, I laughed my butt off. I decided that I needed one for my house at some point. I like people to be aware when they approach that I have a dog, but I don't feel the need to scare them, because my mutt is not mean. I felt humor would be the best way to counter this, and since I have a cat as well, this sign is perfect.

The other project was fairly simple; it was inspired by all the lovely wrapped vases that can be found on Pinterest these days. I love the rustic, yet elegant look that the twine gives the vase. My vase used to be a Tropicana orange juice jug, but with its awesome shape, I felt it deserved a better fate than being tossed in the recycling bin. So now it's holding pretty fresh flowers on my kitchen table. Not bad for some trash and some twine, huh?

Well, that's it for today. Next week, I'll once again be talking about my Halloween costume, but the subject matter will be somewhat fitting for Valentine's Day. I'll be showing you how to make your own arrows (for decorative purposes, of course)! Stay tuned!

As always, if you're looking for more good ideas you can always follow me on Pinterest.

Saturday, January 26, 2013

They're Here!

So here's the view from my front door today:


It's all ice and dreariness as far as the eye can see. Yesterday, I was so excited to see flaky white stuff falling in my yard, but my happiness was not long lasting. Shortly after the snowfall, it began to rain, and then sleet. Combine that with temperatures in the 20's and you have a mess. I needed to get something out of my car last night, but it was frozen shut. Today it's a tad warmer, so the icicles are melting, and by the middle of next week, we're supposed to be experiencing 70-degree weather. What?! I do not understand what's going on at all right now.

However, the crazy weather cannot bother me. Wednesday, I got my first package of costume accessories in the mail! I am now the owner of pointy-ear prosthetics and a wild pink wig. The wig has a little more black in it than I anticipated (Leah's hair is all pink), but I know I can make it work. The ears are just awesome. They're made in USA (bonus!) and are exactly what I wanted. A little makeup and they'll be ready to go. I might just wear these around the house sometimes!

I think the elven look suits me.
Step one to awesome troll hair.

Monday, January 21, 2013

The Pet Net

Part of my goal for this year is to more efficiently use the space I've got in my home. Our house is 1400-ish square feet, so it's not terribly tiny. However, it's an old home, so closets are small, and the layout is not quite as accommodating for a modern lifestyle. That means I'm having to get creative and make storage space where there isn't any.

My first project of the new year involved making a hammock or "pet net" for my little one's burgeoning stuffed animal collection. I know I could have just bought one, but none of my local stores had them in stock, and I would've felt ridiculous ordering that one thing, paying for shipping, and having some delivery guy drive all the way out to the boonies for that. That's not very thrifty or eco-friendly either, especially when my mother had just given me a large, fantastically bright pink piece of nylon material that I had literally no plans for.

Now, I cannot find the tutorial that I originally used to make this hammock, so I'll do my best to describe what I did. First, I measured how large I needed the net to be. This is a corner net, so I went to the corner and eyeballed how far out into the room I wanted the hammock to be and measured from that point to the corner. Then I cut out a square according to those measurements, folded it in half diagonally to form a triangle, and cut it out.

So I had the triangle that was to become my hammock. I then sewed a small hem on each side, somewhere between 1/4 and 3/8 of an inch. After that, I folded each corner over and sewed it, which gave me a straight edge about 4 inches long at each corner. It looked something like the shape at the bottom left of this pic:

Source

The next step was to sew pockets for the hammock's hanging rope. I simply folded over each long side about 1 1/2 inches and sewed them like you'd do a rod pocket for a curtain. Then I ran a rope all the way through each pocket, starting at the corner that would be against the wall, i.e. the corner that forms the right angle. I made sure to leave enough extra rope so that  could have enough to  make loops at each corner, and then I tied it off. All that was left to do was install hooks in the ceiling and hang it up. Once I got it up, I made a few adjustments with the rope to get it to hang the way I wanted, then I loaded up with my little one's stuffed animals. Now she has more floor space and doesn't have to sort through her less played-with toys to get to her favorites.

Tell me that doesn't look nice?


Saturday, January 12, 2013

It's Been Decided

I have to start working on Halloween early. It's only January, yes, but this year I want to be Leah,  my troll hunter from World of Warcraft, so I have to get busy making stuff. It's my hope that I can make all her gear myself, but holy crap, that's going to take some work. Her transmog set, which will be what I'm constructing, you can see here.

I've already begun cutting out templates for the shoulder pieces and gauntlets. To keep the gear lightweight an inexpensive, I've opted to make my pieces out of papier mache and craft foam. Keep your fingers crossed that my faux painting skills are good enough to make it convincing!

This costume has a few challenging aspects that I'll need to overcome. Leah has a hot pink mohawk and braids, pointed ears, tusks, only two toes on each foot, and only three fingers on each hand. The ears and tusks I plan to take care of by using prosthetics, and the hair I plan to take care of with a wig. For the fingers and toes I'll have to get creative, and I'll show you my solution for this when the time comes. Oh, and did I mention she's green-skinned? I guess a little cream face paint will take care of that.

I'm photographing the whole process, and I plan to do step by step coverage of my journey to becoming Leah, so you guys will get to see the whole thing unfold throughout the coming months. My enthusiasm has been contagious, it seems, as my husband is now thinking that he wants to resurrect his old troll warrior Boaris to dress up with me. Frankly, nothing would make me happier, but we'll see if he goes through with it or not. I'm hoping to make the whole process look so fun that my little one will want to be our little troll baby. If she doesn't, that's okay, but I can't pretend that I won't be a little bummed. I've always wanted to do a themed family costume set, and a troll family would be awesome.

Monday, January 7, 2013

An Argument for the Oxford Comma

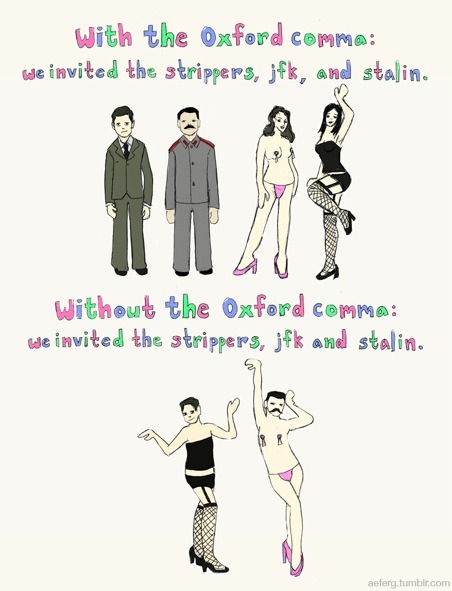
People I know sometimes look to me for advice on grammar. "You were an English major," they say. While I remember grammar rules and can normally help, I don't consider myself any more qualified than anyone else to give advice, because my degree is actually for literature. Besides, if my time studying lit in college taught me anything, it's that the rules for writing are fluid at best. Some of the best writers of all time bent the grammar rules or even broke them entirely. This is not to say I believe grammar rules are unnecessary. I firmly believe there's a distinct difference between E.E. Cummings writing exclusively in lower case, Lewis Carroll writing "Jabberwocky," and the stuff that ends up on this site: The Best Responses to Misspellings on Facebook. The grammar rules we were taught in elementary school can prevent confusion and occasionally keep you from looking downright stupid. It's with this in mind that I bring you a most convincing argument for the Oxford comma:
Source.
The Oxford comma is considered optional, but you can see here that it does lend clarity to just who was invited to the party. In this case, leaving it out could cause some... ambiguity. Either way, using it or not is up to you (or your persnickety English teacher). I'll have you know though, if the Internet is to be believed, Hugh Jackman finds the Oxford comma sexy. I hope you enjoyed your little grammar lesson. If you'd like to see more grammar and literature related funnies, visit my Pinterest board: I'm an English Major

Sunday, December 30, 2012

Quilting

This week, I'm going to talk about my first ever quilting project. A while back, I got the idea in my head that I needed an exercise mat. I'm not really sure why, because I don't actually exercise indoors all that often (I like to walk), and when I do, a towel or blanket on the floor usually works great, but meh, when my mind gets an idea stuck in it, I have a hard time shaking it. However, I knew I didn't want to just go out and buy one, so I decided to go through my fabric bin and see what I could come up with. What I found was an old pair of curtains I made for our NY house that had a light olive green fabric up top and a cream/floral pattern on the bottom. So my mat is recycled. How do you like that? Even my off-white border pieces came from old curtains.

I lost interest in this project for a while, but I'm happy to report that I finally finished it, in time for New Years, even. New yoga routine, here I come!

Here's a pic of the top part all pieced together; I was honestly amazed at how fast it went together.  It took me all of two hours to go from pieces to pinned and ready for quilting. What did take forever, was cutting the pieces out. That was not fun, I'm not gonna lie. But hey, once that was over, it was smooth sailing. Even the quilting went fast, because (shh, don't tell my mother-in-law) I machine quilted it. Now, I had every intention to hand quilt this baby - I bought a quilt hoop and everything! But I had finished my first square and was starting my second when I said to myself, "Why are you doing this by hand? It's just straight lines. You'll get done so much faster if you machine it." And you know what? I was right; it was much faster. I did learn that I can't do quilting on my machine for anything much bigger than this mat, because keeping everything from bunching up would be nigh impossible. And of course, if I do anything other than straight lines, it would be best if I did them by hand, but for now, the quilting is done, and I'm pleased with how it turned out. It's not perfect, but it's good for a first try. 


The final step was binding it all together. I got my bias tape and started stitching, but about 1/3 of the way through, it became blatantly obvious that I didn't know what I was doing. The bias tape wouldn't stop bunching, and even with pins, I sometimes was missing the quilt all together. A quick call to the quilting expert, AKA mom-in-law revealed that I had to hand-stitch the binding, or at least one part of it. Now, all that being said, I still decided to finish the binding the way I started, just so the bad part wouldn't look even worse by comparison. Is that wrong? Even so, my exercise mat turned out pretty nice. Not bad at all for a first attempt. Take a look:

I even added ties so it rolls up!

Tuesday, December 25, 2012

Merry Christmas!

Hello, everyone! I've got nothing to post this week because of the holiday. After I have a chance to wind down, I'll post some new content. Until then, merry Christmas and happy New Year!